
Task Details
Regardless of where you create a task in HubSpot, you can fill in the following information:
- Title: Enter a task name in the Title field. Include the text call or email in the title of your task to automatically set the corresponding task type.
- Type: Select Call, Email, or To-do.
- Priority: Select if the task is low, medium, or high priority.
- Associate with records or [x] associations: Search and select records to associate with the task.
- Assigned to: Select the user who the task is assigned to.
- Queue: Add the task to an existing task queue or create a new task queue. We currently do not have a queue set up so leave as none.
- Due date: Select the date and time the task is due. The time format is determined based on your date and number settings.
- Set to repeat: Select the checkbox, then enter a number and select an interval of time for your task to repeat. This option is available to Sales Hub or Service Hub Starter, Professional, and Enterprise users only. The Set to repeat option appears when creating tasks from the tasks index page or within an individual record, but not when creating tasks from an object index page.
- Task reminders or Send reminder: Select when an email reminder should be sent to the task owner.
- Notes: Enter details about your task.
Create a Task From the Tasks Page
Step 1 — Navigate to CRM > Tasks.
Step 2 — Click Create task.
In the upper right, click Create task.
Step 3 — Enter the task details.
In the right panel, enter the details for your task.
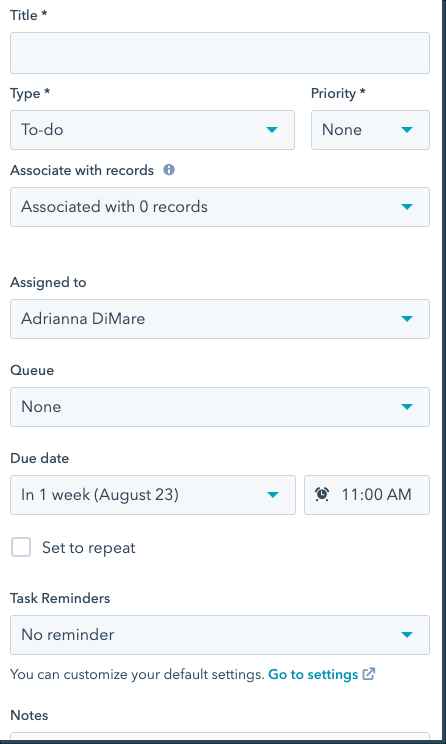
Step 4 — Click Create.
To create the current task and start creating another task, click Create and add another.
Create Tasks for Specific Records
Navigate to the applicable records:
- Contacts: Navigate to CRM > Contacts.
- Companies: Navigate to CRM > Companies.
- Deals: Navigate to CRM > Deals.
- Tickets: Navigate to CRM > Tickets.
- Custom objects: Navigate to Contacts > [Custom object]. If your account has more than one custom object, hover over Custom Objects, then select the custom object you want to view.
Create Tasks for Multiple Records in Bulk
You can only create tasks in bulk for the current page you're viewing. You cannot create tasks for multiple pages. For example, if you are reviewing 100 contacts at a time, you can only create tasks for those 100 contacts.
Step 1 — Select the records.
Select the checkboxes next to the records you want to create tasks for.
Step 2 — Click + Create tasks.
Click + Create tasks at the top of the table.
Step 3 — Enter the task details and click Create.
In the right panel, enter the details for your tasks, then click Create. A task will be created for each selected record.
Create a Task for an Individual Record
Step 1 — Click the name of the record.
Step 2 — Click Task.
In the left panel, click Task.
Step 3 — Enter the task details.
In the task editor, enter the details for your task.
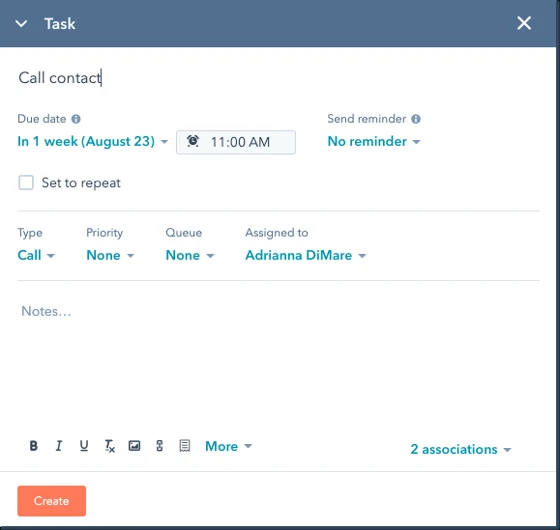
Step 4 — Click Create.
Create Follow-Up Tasks on Record Activities
Navigate to the applicable record:
- Contacts: Navigate to CRM > Contacts.
- Companies: Navigate to CRM > Companies.
- Deals: Navigate to CRM > Deals.
- Tickets: Navigate to CRM > Tickets.
- Custom objects: Navigate to Contacts > [Custom object]. If your account has more than one custom object, hover over Custom Objects, then select the custom object you want to view.
Step 1 — Click the name of the record.
Step 2 — Select the activity.
In the left panel, click Log to log a call, email, or meeting, or Note to create a note. You can also click Email to draft a one-to-one email.
Step 3 — Select Create a task to follow up.
At the bottom of the activity editor, select the Create a task to follow up checkbox and click the dropdown menu to set a due date for your task.
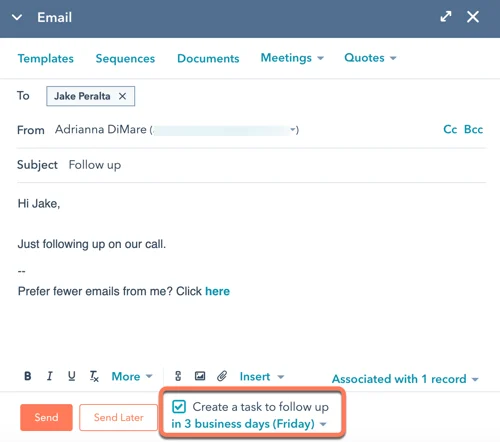
Step 4 — Complete the activity.
Depending on the activity, click Log activity, Save note, or Send. A new task will be created.
Create Tasks Using Workflows
This functionality is available to Professional and Enterprise users only.
You can automatically create tasks using the workflows tool.
Step 1 — Create or edit a workflow.
Step 2 — Click the + plus icon.
Step 3 — Select Create task.
In the left panel, expand the CRM section. Then, select Create task.
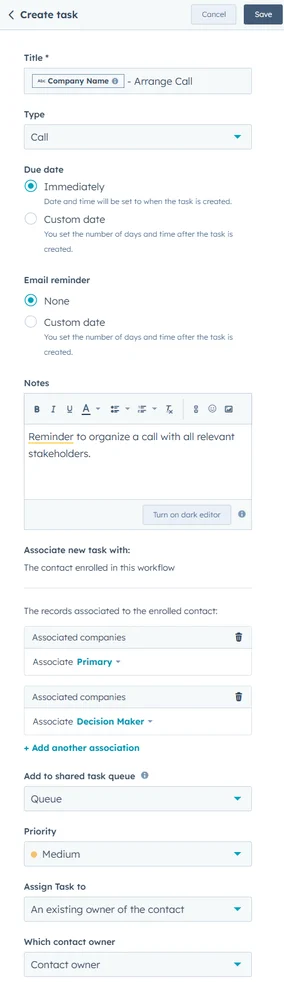
Step 4 — Configure the task details.
Configure the following:
- Title: The name of the task.
- Type: The type of task, such as Email, Call, To-do, Sales Navigator - InMail, or Sales Navigator - Connection Request.
- Due date: If the task is due immediately, or on a custom date.
- Email reminder: If the assigned user should receive a task reminder email.
- Notes: Any additional details for the task.
- Add another association: By default, the task will be associated with the record enrolled in the task. Use this option to associate the task with another record. You can associate multiple records with the task. To associate another record, click + Add another association.
- Add task to shared queue: Add the new task to a shared task queue.
- Priority: The priority level of the task, whether low, medium, or high.
- Assign Task to: Choose who to assign the task to, whether the record's owner, a specific user, or no one.
Set Tasks to Repeat
This functionality is available to users with a paid seat of Sales Hub or Service Hub Starter, Professional, and Enterprise. A user with a paid seat cannot create a repeating task for a non-paid user.
When you set a task to repeat, a new task will be created if the previous task is completed, deleted, or becomes overdue. If a repeating task is overdue, both the original task and the new task will appear as tasks to complete.
Step 1 — Navigate to your tasks or records.
- Tasks: Navigate to CRM > Tasks.
- Contacts: Navigate to CRM > Contacts.
- Companies: Navigate to CRM > Companies.
- Deals: Navigate to CRM > Deals.
- Tickets: Navigate to CRM > Tickets.
- Custom objects: Navigate to Contacts > [Custom object]. If your account has more than one custom object, hover over Custom Objects, then select the custom object you want to view.
Step 2 — Open the task creation option.
If you're on the tasks index page, click Create task in the upper right.
If you're on an object index page, click the name of the record. In the record's left panel, click Task.
Step 3 — Select Set to repeat.
In the right panel or in the record's task editor, select the Set to repeat checkbox.
Step 4 — Select the repeat interval.
Enter or click the arrows to select a number, then use the dropdown menu to select days, weeks, months, or years as the interval of time for your task to repeat.
Step 5 — Click Create.
Enter the remaining details for your task, then click Create.
To stop new recurring tasks from being created, edit an individual task in the series and clear the Set to repeat checkbox.
Set Defaults for Creating Tasks
You can set a default due date, due time, and time period before a task's due date to receive a reminder. These preferences apply to all tasks you create in the tasks index page or on a record. Tasks created in a sequence will not populate with these defaults.
Step 1 — Open Profile & Preferences.
Click your account name in the top right corner, then click Profile & Preferences.
Step 2 — Select the Tasks tab.
Step 3 — Select the defaults.
In the Defaults section, use the dropdown menus to select:
- Due date: Select the default number of days or weeks that your tasks are due after they are created.
- Due time: Select the default time that your tasks are due.
- Reminder: Select the default amount of time before your task's due date to receive a reminder. Select No reminder to turn off default task reminders.
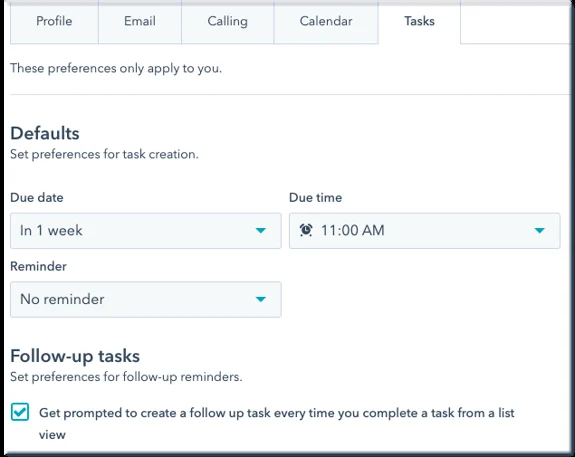
Step 4 — Select the follow-up task preference.
In the Follow-up tasks section, select the checkbox to receive a reminder to create a follow-up task every time you complete a task from a list view. Clear the checkbox to turn off follow-up reminders.
Step 5 — Click Save.
Your defaults will automatically populate the Due date and Task Reminders fields when you create a new task, but you can still adjust these fields for individual tasks as needed.